Please install the Stellarium software on your computer using the instructions in the procedure. If you own a laptop, please bring it to class. You will submit your answers on Cobra using the answer sheet (Word, RTF).
The shortcuts you learn to use in this lab are on the inside cover of your lab packet and here.
Pre-Lab Assignment: Please read the Lab Procedures. Answer the pre-lab questions before coming to the lab room every week. Occasionally, the questions will require you to check your class notes or to look up information in the textbook. You will not be able to complete the lab without answering these questions.
A) Have you had any astronomy courses in the past? If so, please provide some details.
B) What do you expect to learn in this class?
C) This is a course on the Solar System. Which topic in class are you most eager to learn about?
Introduction: In this activity, you will become familiar with the basic workings of the Stellarium program and you will be introduced to many of the procedures you will be asked to follow for other assignments in the class. Be sure to answer all of the questions in the tutorial.
The Stellarium software is accessible in the computer labs at Parkland, including the library. If you are using the computer lab, please skip the installation instructions.
Installing the program: To run the program at home, you will need to install the program to your hard drive. Please access the website stellarium.org to obtain the free software for your operating system. Stellarium also has a user guide available. When you click the version to install, the download should begin automatically after the next page loads.
| Windows users: Newer computers have 64-bit processors, but you can check using instructions found here. |
| Mac users: If your computer isn’t letting you install third-party software, please consult these instructions. |
| Chromebook users: Please follow these instructions to install the software. |

Once the main window pops up, you should get acquainted with the layout of the main interface. At the bottom is the status bar. On the far left, your location and altitude above sea level will be listed; the location is initially set based on your network location.
Next, it tells you the "FOV," i.e. your field of view from top to bottom. The default is 60°. This is the optimal view for simulating the sky, and you can use the shortcut "\" to change the field of view back to 60°.
The following item displays the refresh rate for the animation in frames per second, or FPS. This will vary depending on the active memory being used by your computer.
Finally, the date and time are displayed based in the format "YYYY-MM-DD HH:MM:SS" in 24-hour time. For example, 2024 January 9 at 2:00 PM would be 2024-01-09 14:00:00. Daylight Saving Time is automatically run based on your location.
There are dock menus which pop out from the left side and the bottom. The left menu controls the broader settings, while the bottom menu controls your viewing settings. Place your mouse cursor over each of the buttons to get a description of what each button does. A keyboard shortcut will also be listed in brackets.
When you start the program, it may take up the whole screen. To take the software out of full-screen mode, click the button highlighted in the box in the image below or click F11. (You may have to hold the Function or "Fn" key.)

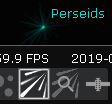
You will also see some meteor showers displayed, such as the image below. Press "Ctrl Shift M" ("Command Shift M" for Macs) to turn off this display.
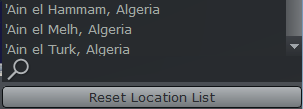
Does the location match where you are? If not, open the Location window using either the shortcut key "F6" (you may have to hold the Function or "Fn" key at the same time) or by clicking the top button on the left menu shaped like a compass. The search bar is next to the magnifying glass symbol, where you may type in the name of any town currently listed.
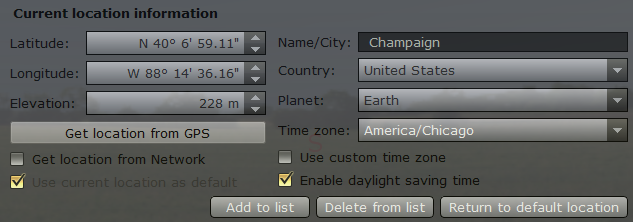
Please find "Champaign, United States" in the list of cities and click on the name in the list. Make sure the coordinates match what you see in the image below. When you change the location to Champaign, the red arrow on the map should move to that location. Close the Location window by clicking the "☓" in the upper right-hand corner.
You can change your view of the sky by dragging it with your mouse. By default, the sky will face the cardinal direction south so you see an "S" on the horizon. Click and hold the mouse button on any point, which will allow you to change your view. You may also use the arrows on your keyboard to alter your viewable sky.
When you select an object in Stellarium, the information for the object appears in the upper left corner of the screen, but the default setting displays more information than we need. Open the Configuration window using either the shortcut key "F2" or by clicking the fifth button on the left menu shaped like a wrench. Select the Information tab. Please click “Short” to reduce the number of "Displayed fields", then make sure the following boxes are checked: Name, Catalog number(s), Right ascension/Declination (J2000), Azimuth/Altitude, Visual magnitude, Type, Size, and Distance. Select the Main tab, then click "Save settings," and close the Configuration window.
The date and time can be adjusted by accessing the Date and Time window using either the shortcut key "F5" or by clicking the second button on the left menu shaped like a clock. You may change any entry by using the up and down arrow keys. When a number is highlighted, you can type in a new value. Practice changing the date and time to get comfortable using this feature.
You will submit your answers on Cobra. Please use the answer sheets (Word, RTF).
Change the date and time to 2024-01-08 at 12:00 (noon). the seconds won't matter. Use "\" to keep the field of view at 60°.
1. Is the Sun close to due south, i.e. directly above the “S” in the sky? If it isn't, please contact your instructor so they can help resolve the issue.
When you are in the main window in Stellarium, typing the number "8" is a useful keyboard shortcut for setting the time. Watch how the date and time change when you type "8" in the main window.
2. How does typing "8" change the date and time?
Set the time to 21:00 (9:00 PM) before you move on to the next step. When viewing the sky, you will notice the ground and the sky, as well as the letter "S" at the horizon representing south. Keep an eye on the stars as the time changes.
When using Stellarium, the sky normally moves in real time, but you can control this rate of motion. You have four buttons on the right side of the bottom menu which control the rate of motion: Reverse, Play, Now, and Forward.
Clicking the Reverse or Forward buttons multiple times allows you to speed up the time flow in either direction, and they can also slow down the time flow when they oppose the motion. The Play button resets the time flow to real time and also acts as a Pause button when the sky is changing in real time.
Finally, the Now button changes the time flow to real time AND changes the date and time to the present. The Reverse, Play/Pause, and Forward buttons all have easy keyboard shortcuts as well: "J", "K", and "L" respectively.
3. From the normal time rate or Play setting, increase the Forward rate three times. Watch the southern sky for about 30 seconds and describe what you see. Which direction are the stars moving?
Instead of altering the rate of time flow, you can move in discrete time steps. Pause the time flow and reset the time to 21:00 (9 PM). Pay attention to the time and date as you click the "-" and "=" keys. You can also change the time at different rates by holding down the "Ctrl" key at the same time.
| Mac users: For the keyboard shortcuts listed below, use Command (⌘) instead of Control ("Ctrl"). |
Record how much the date or time changes when using each of the following keyboard shortcuts. If it isn’t clear, press the shortcut multiple times to see the effect each time.
| 4A. - | 4B. = | 4C. [ | 4D. ] | 4E. Ctrl - | 4F. Ctrl = |
You can select any of the points of light in your field of view to see some information about the object. Choose a bright, unlabeled point of light in the night sky (no planets) and click the mouse button to select it.
5. Write down the name of the object (only the first part listed), its magnitude (only the first number listed), and its distance from Earth rounded to one decimal place. Don't forget the distance units.
|
Celestial coordinates allow us to communicate the location of objects in the sky. We will
use two of these today.
Azimuth (Az) is a coordinate which measures the cardinal direction in the sky. North lies at an azimuth of 0°, and the numbers increase clockwise, going toward 90° in the east, 180° in the south, 270° in the west, and approaching 360° at it returns to north. Altitude (Alt) measures the angle relative to the horizon. The horizon has an altitude of 0° and the zenith, the point directly overhead, is 90° from the horizon. Objects below the horizon have negative altitudes. When the atmosphere is activated, the Az/Alt will be the (apparent) values, which show how their positions are bent by the atmosphere. If you see Az/Alt: +161°16'58.0"/+24°25'33.8", the azimuth is 161° and the altitude is 24°. |
View the northern sky by moving the screen until the cardinal direction "N" is at the center of the horizon. Move up so you don’t see much ground. Reset the time to 21:00 and make sure your FOV is still 60°.
6. What is the brightest star at 40° altitude above the "N"?
Something that you will have noticed is that it is often hard to keep track of the stars because the Sun comes up. Fortunately, Stellarium allows you to remove the effects of daylight hitting the atmosphere. On the bottom menu, one of the highlighted icons looks like a cloud obscuring light. Clicking this button or typing the shortcut, "A", removes the atmosphere and allows you to see the stars hidden by scattered sunlight.
From the normal time rate or Play setting, increase the Forward rate four times.
7. Describe how the star in question 6 moves. Describe how the other stars move.
Once you are done, return to normal time rate by pressing the Play button or the shortcut "K".
Change your view direction so you are facing to the south and the letter
"S" on the horizon is near the bottom of the screen. Use "\" to
keep the field of view at 60˚. Change the date and time to the following:
2028-02-14 03:00 (2028 February 14 at 3 am)
This will be the time used for the rest of the lab. Make sure the time is paused. You should see a field of stars, the Moon almost directly south, and at least one labeled planet. If you'd like, you may remove the labels for the planets, the Sun, and the Moon by clicking the planet-shaped icon on the bottom menu or by typing the shortcut, "alt-P".
8. Identify the planet (check the type when you select it) in the field of view closest to the Moon. Is the planet higher or lower than the Moon in the sky? Is the planet to the left or the right of the Moon in the sky?
Of course, the planet doesn't look very exciting right now. Stellarium allows you to correct this by getting closer views of objects in the sky. After selecting the planet with the mouse, you may zoom in close to the planet by using the shortcut "/". To zoom out, you may use the shortcut "\". You may also use the Page Up and Page Down keys (Fn+Up on a Mac).
| To type the degree symbol (°) on the answer sheet, we recommend you copy (Ctrl-C) the symbol from elsewhere, then paste (Ctrl-V) it into your answer. Mac users can also type Opt-K. |
9A. After magnifying the closer planet, list the size of the field of view (FOV).
9B. Describe the closer planet as you see it.
10A. You should also see several of the planet's moons. If
not, press "\" once. Name these moons.
10B. Describe their layout relative to the planet.
Please return the field of view to 60° and facing due south using your preferred method. Now we can look at ways in which you can navigate around the night sky.
|
Rounding and degrees:
These coordinates are measured in degrees (°), arcminutes ('), and arcseconds ("). For example, you may see a altitude of 19°35'12". Round them to the nearest degree by checking the arcminute value. If it is 30' or more, round up. In our example, it rounds up to 20°. |
11. While the planet is selected, record its azimuth and altitude rounded to the nearest degree.
12. Now select Earth's Moon and record its azimuth and altitude rounded to the nearest degree.
13A. Does the higher object have a higher or a lower altitude?
13B. Does the object farther to the left have a higher or a lower azimuth?
In reality, astronomers only use coordinates if they are making detailed observations of objects located very far away. Amateur astronomers find their way around the sky by using familiar points of reference, such as bright stars. To make navigation easier, the sky was broken up into a set of 88 regions called constellations.
You can display the constellations by clicking the buttons on the left side of the bottom menu. The far left button connects the brightest stars of the constellation, which can be activated with the shortcut "C". The second button, or the shortcut "V", displays the names of each constellation in the sky. Unfortunately, the lines and labels don't show you where each constellation begins and ends. The shortcut "B" will display the boundaries between each constellation.
14A. Display the boundaries using the shortcut given. Describe what has
happened to the view on the screen.
14B. What constellation is the closer planet to the Moon located in?
If you've ever wanted to help learn where the constellations are in the sky, Stellarium can be very useful. The constellation lines may help you recognize the patterns of the brighter stars in the sky. By selecting the third button on the bottom menu or the shortcut "R", you can also see illustrations of each asterism that gives a constellation its name.
As a last task, let's find some objects in the sky. The easiest way to do this is to open the search window by clicking on the magnifying glass-shaped icon on the left side of the screen or you may also type "F3". As you type the name of an object like the Moon, several objects will be listed below the search bar.
If the object is below the horizon, you may remove the ground by typing the shortcut "G" or finding the button shaped like a couple trees on the bottom menu.
Record the constellation which the following objects are in on the same date and time you've used since question 8. If it's not clearly within constellation boundaries, you didn't display the boundaries correctly.
| 15A. Mercury | 15B. the Sun | 15C. Earth's Moon | 15D. Vesta |
For fun and a point of extra credit, let's play with one of the more fun features of Stellarium's location options. The Location window feature allows you to travel to other parts of the Solar System. Change the "planet" in the Location window to Mars, then use the Search window to find Earth. Earth will be below the horizon at the time you've worked with, so go to 2026-11-23 13:00.
Extra Credit: What constellation is Earth in at that time when viewed from Mars? Without zooming in, briefly describe its appearance in the skies of Mars in comparison to the stars and planets.